SpringBoot入门 - SpringBoot HelloWorld
SpringBoot入门 - SpringBoot HelloWorld
提示
我们了解了SpringBoot和SpringFramework的关系之后,我们可以开始创建一个Hello World级别的项目了。
- [SpringBoot入门 - SpringBoot HelloWorld](#springboot入门 - springboot helloworld)
- [创建 SpringBoot Web 应用](#创建 springboot web 应用)
- 初始化后内容
- 给你的第一个应用添加包和代码
- 运行你的第一个程序
- 一些思考
- 为什么我们添加一个starter-web模块便可以了呢?
- [我们如何更改更多Server的配置呢?比如Tomcat Server](#我们如何更改更多server的配置呢?比如tomcat server)
- SpringBoot还提供了哪些starter模块呢?
- 示例源码
创建 SpringBoot Web 应用
为快速进行开发,推荐你使用IDEA这类开发工具,它将大大提升你学习和开发的效率。
- 选择 Spring Initialize
Spring提供的初始化项目的工具
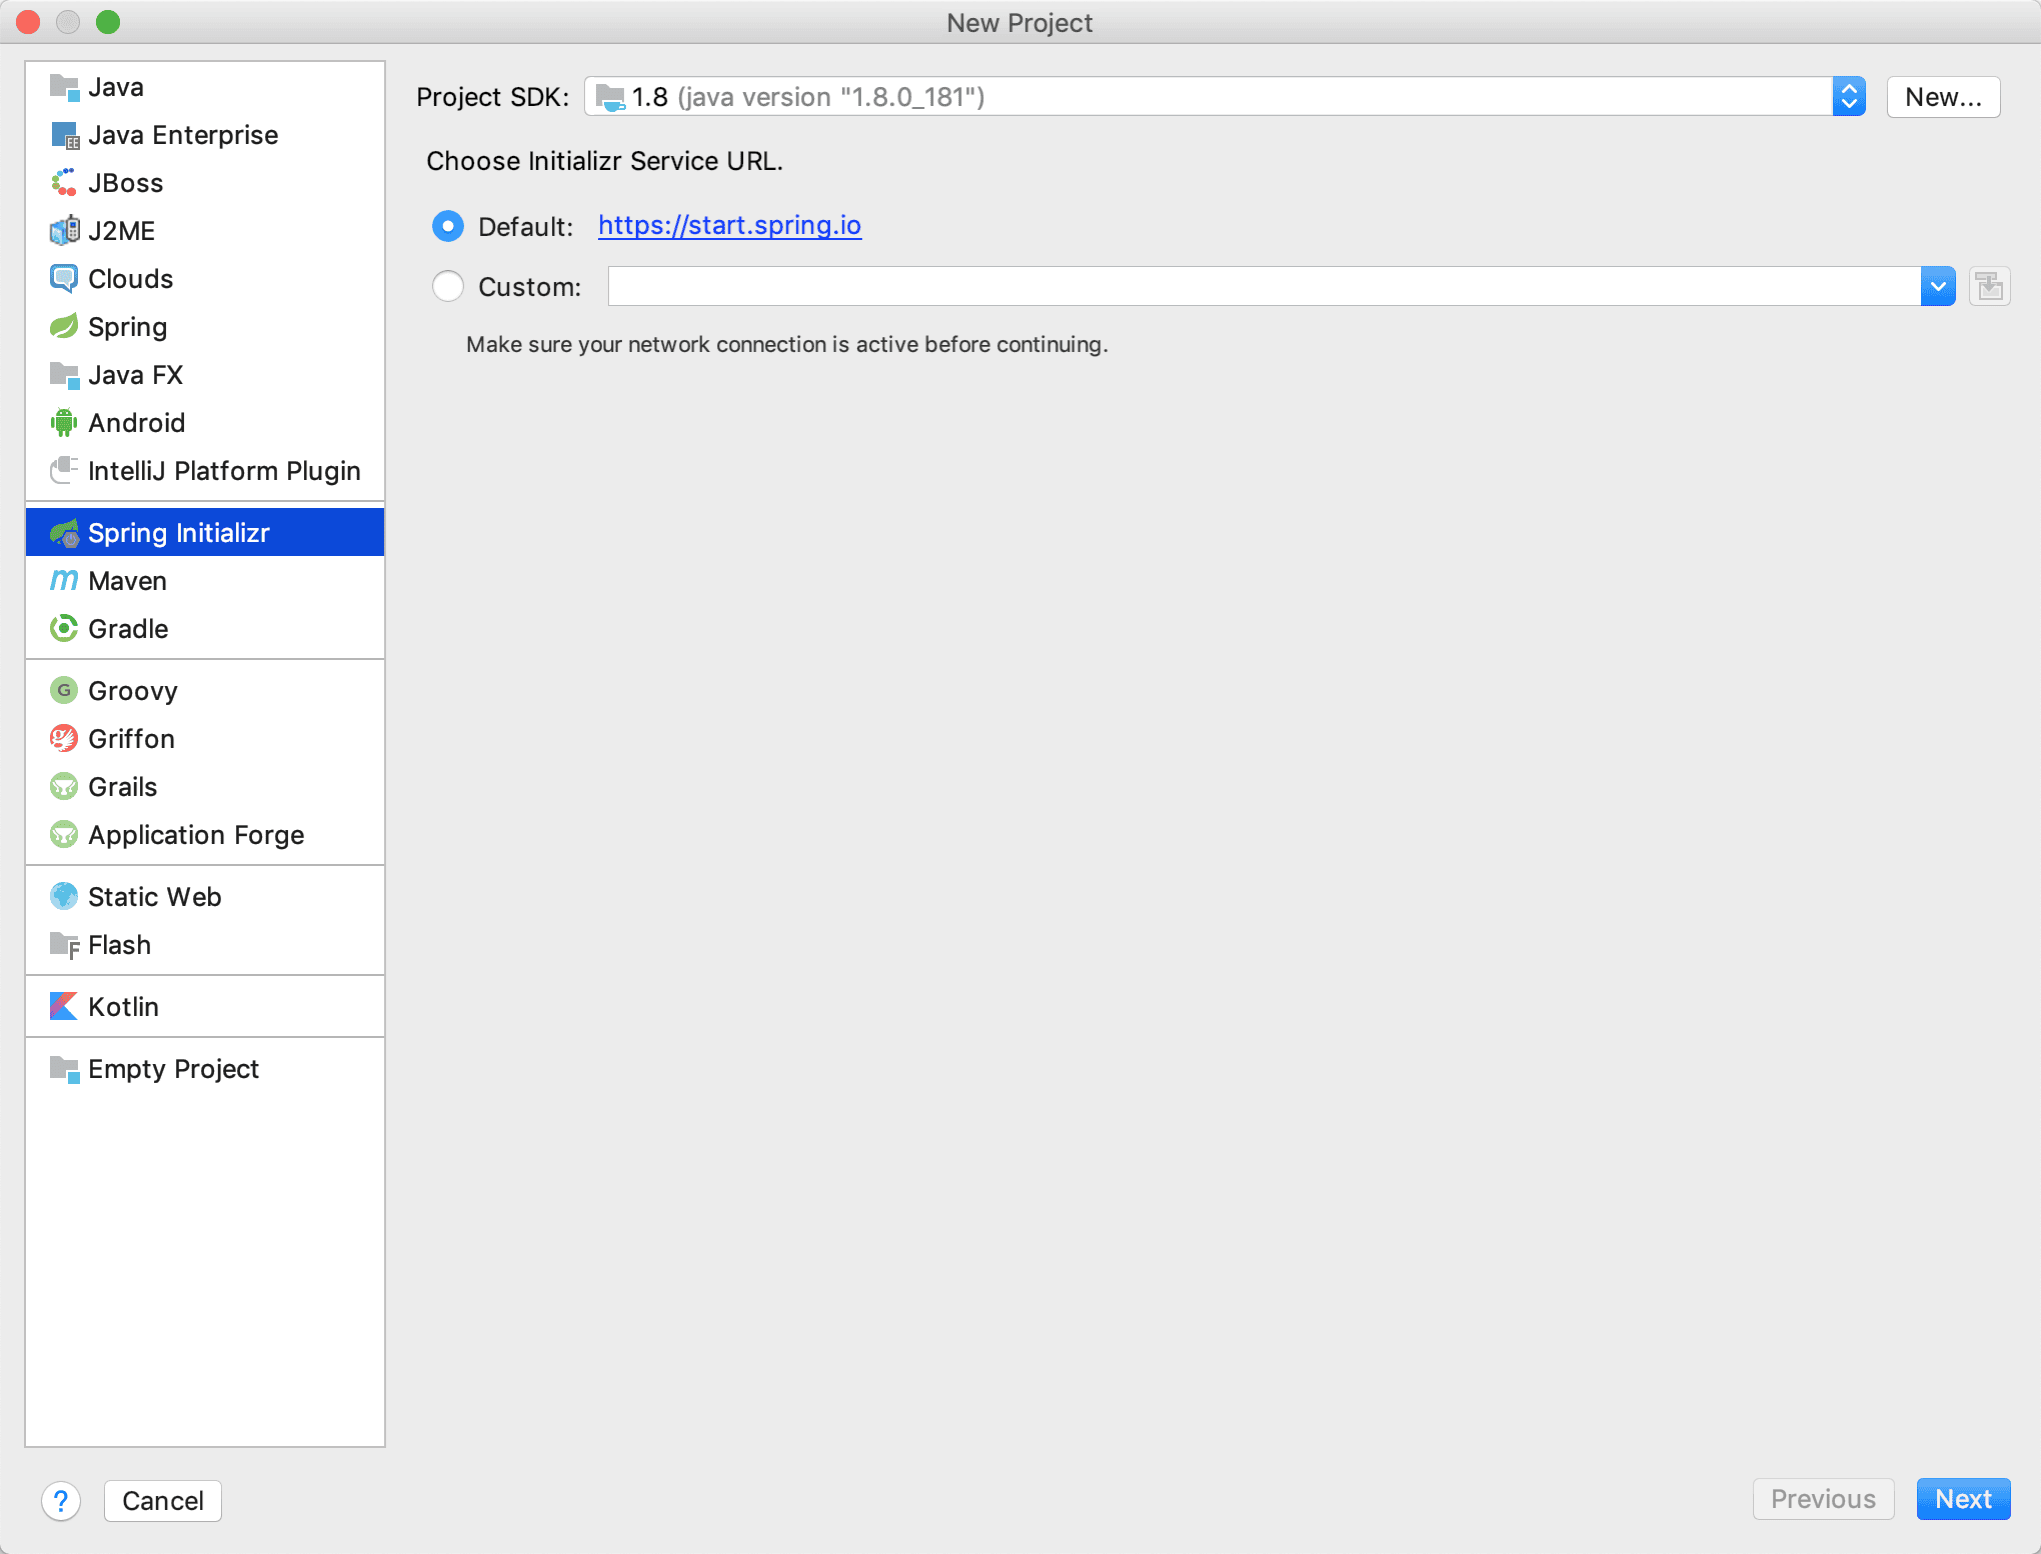
当然你可以在 https://start.spring.io/ 在新窗口打开 中初始化你项目工程
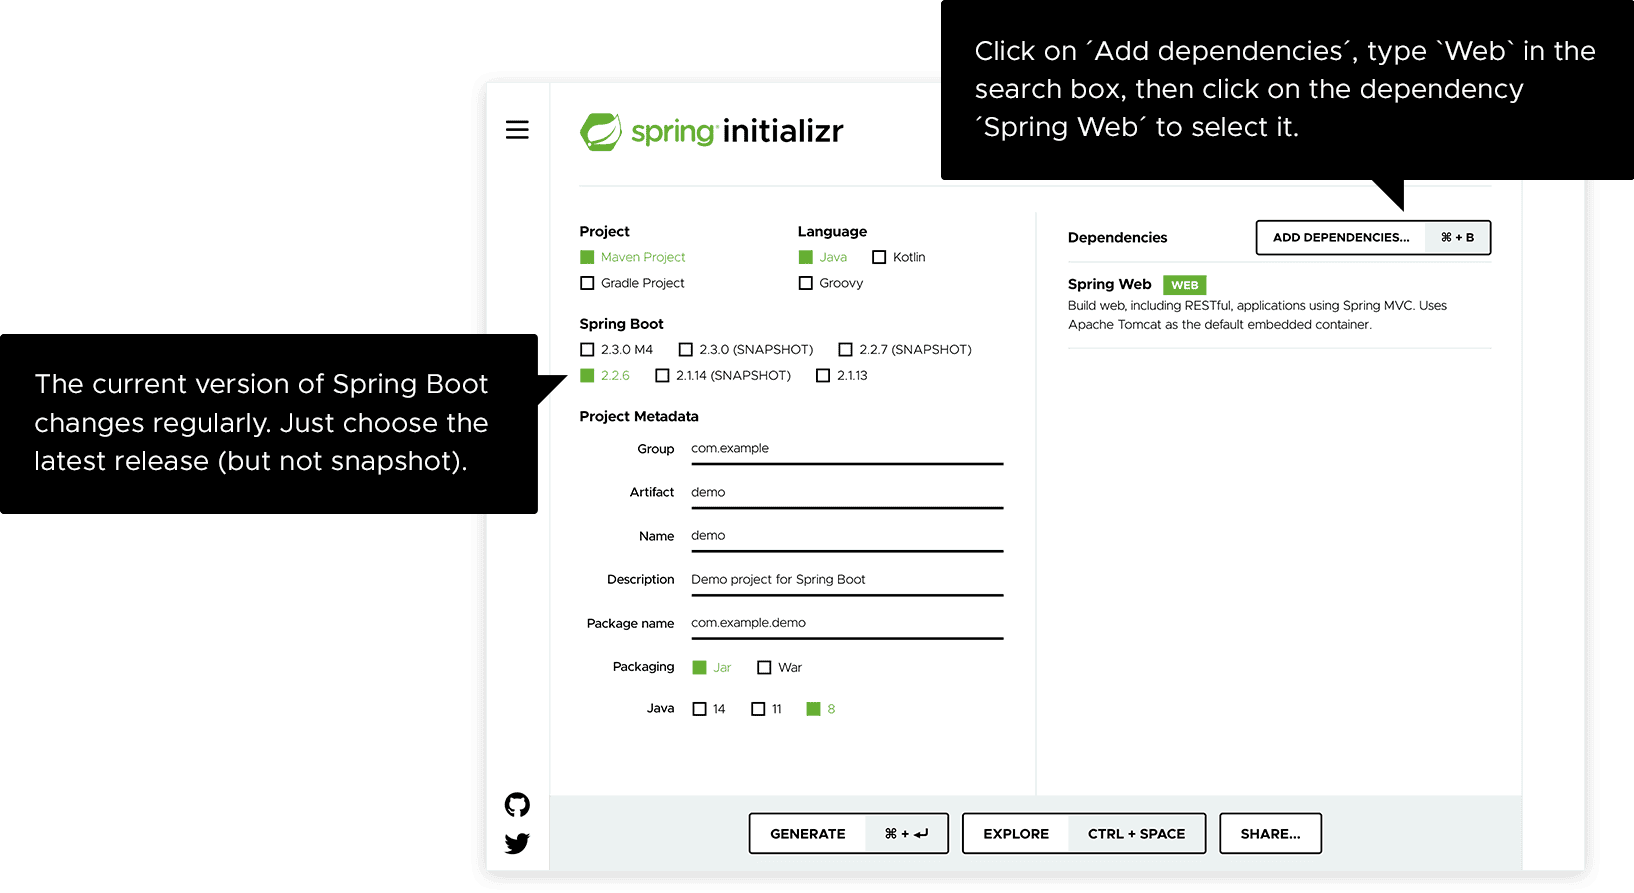
- 填写 GAV三元组
- Group: 是公司或者组织的名称,是一种命名空间的概念,比如网站,那么group可以是tech.pdai
- Artifat: 当前项目的唯一标识
- Version: 项目的版本号,一般xx-SNAPSHOT表示非稳定版

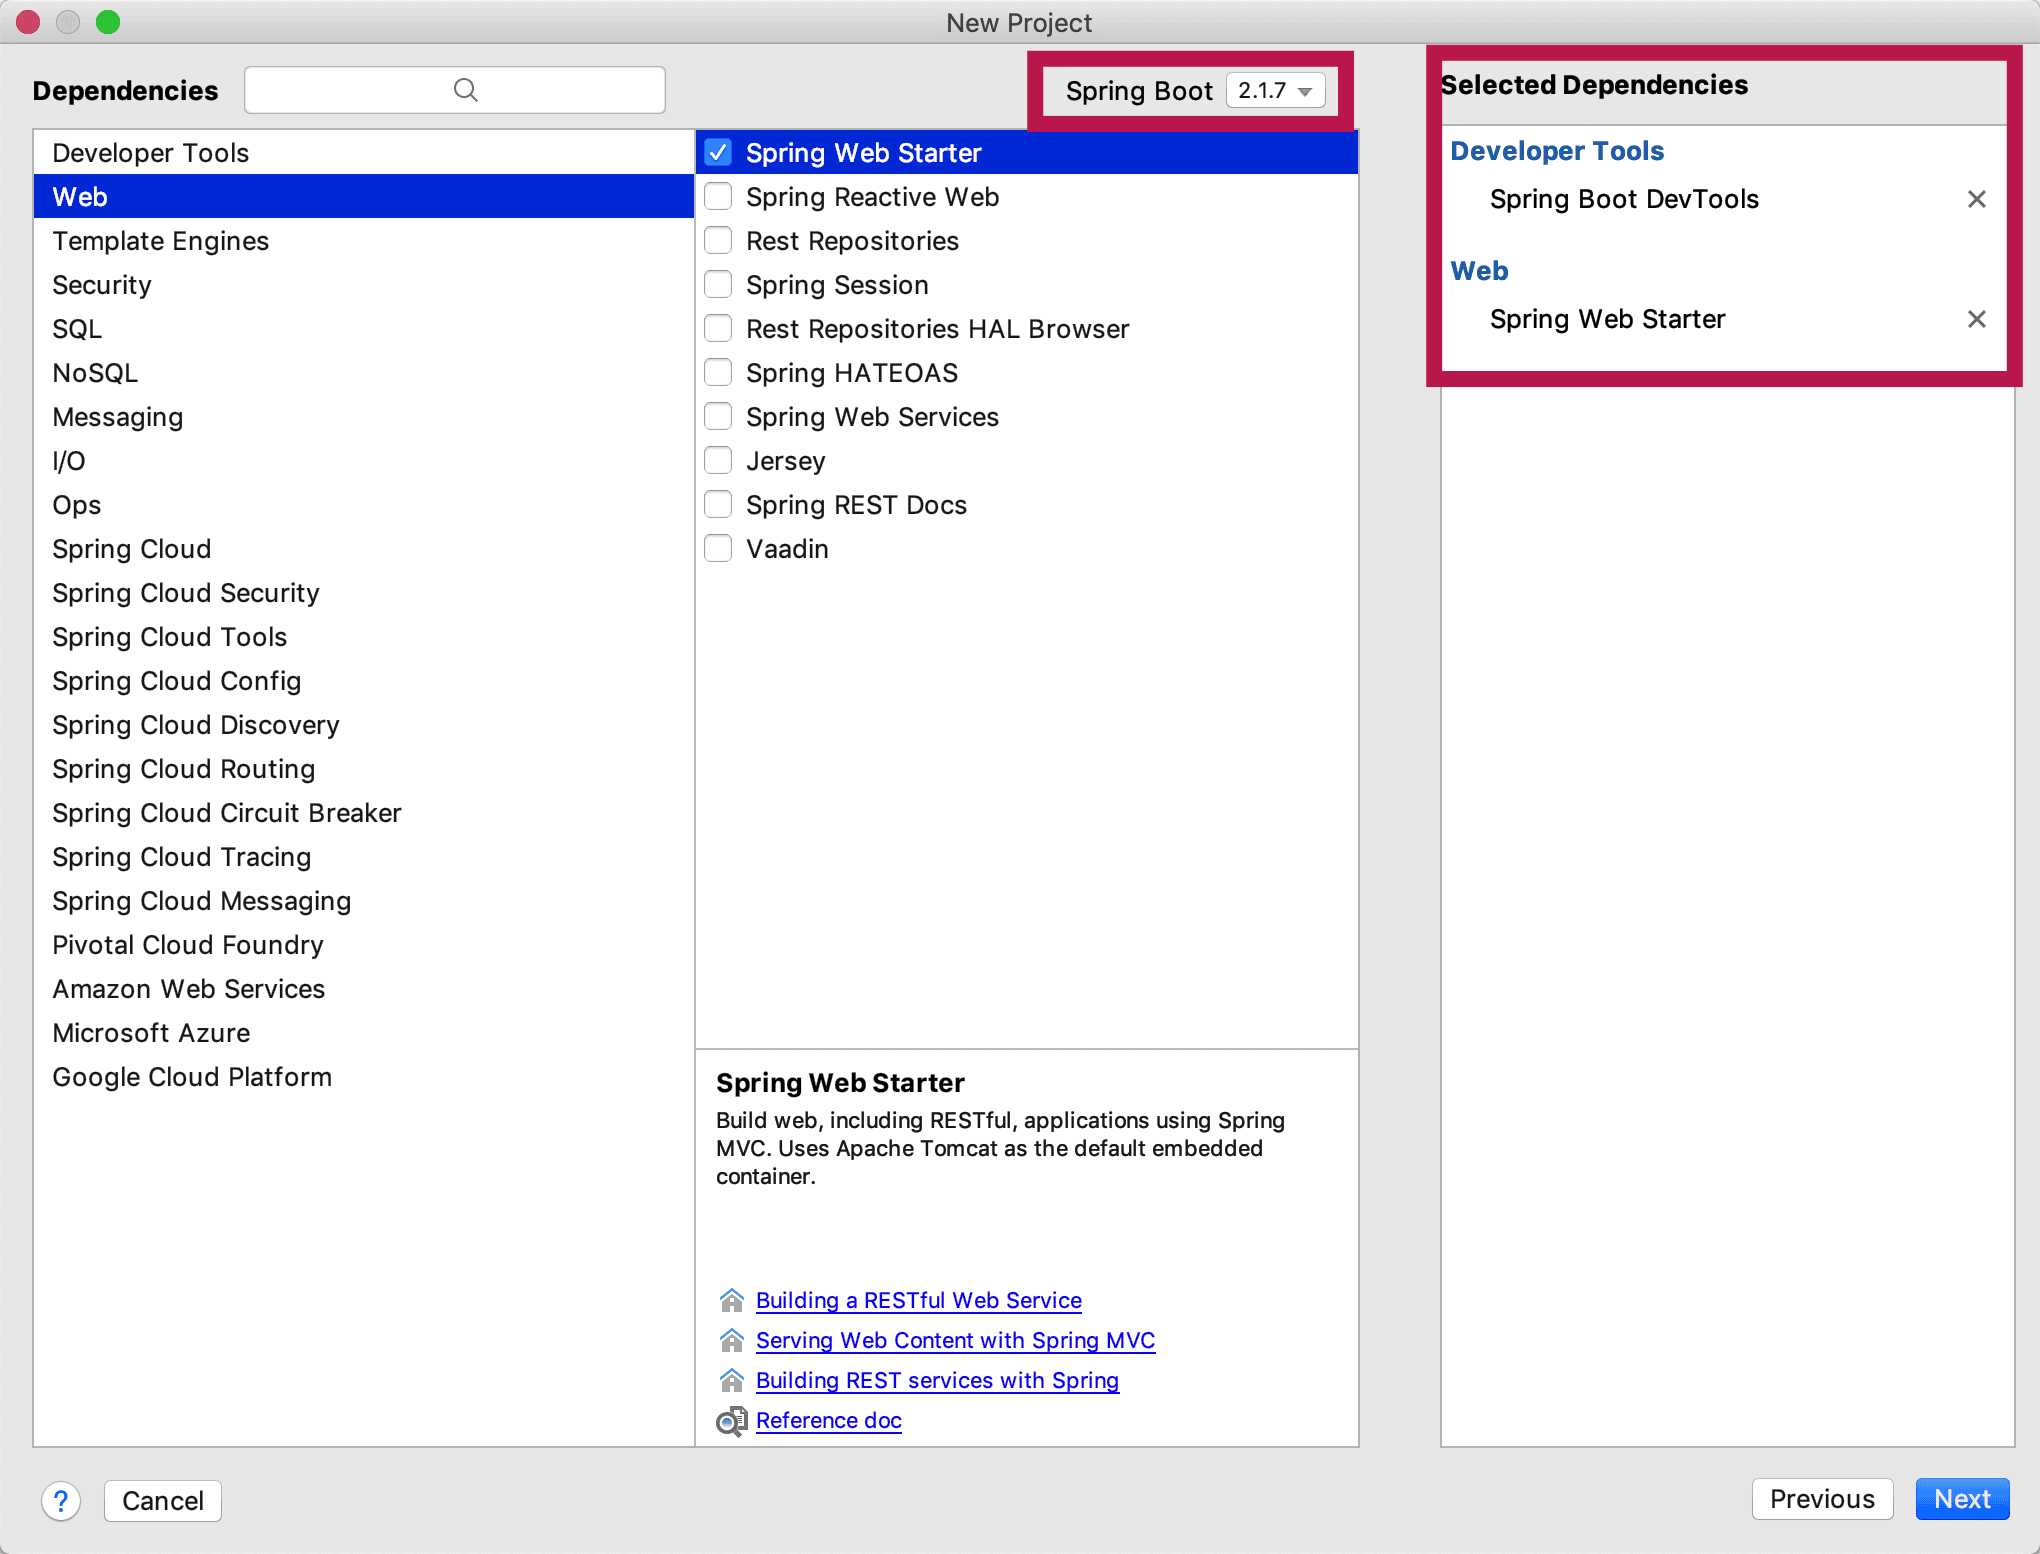
- 选择初始化模块
Spring Initialize可以帮助你选择常见的功能模块的starter包
- 项目名
最后我们输入我们项目的名称,既可以初始化项目

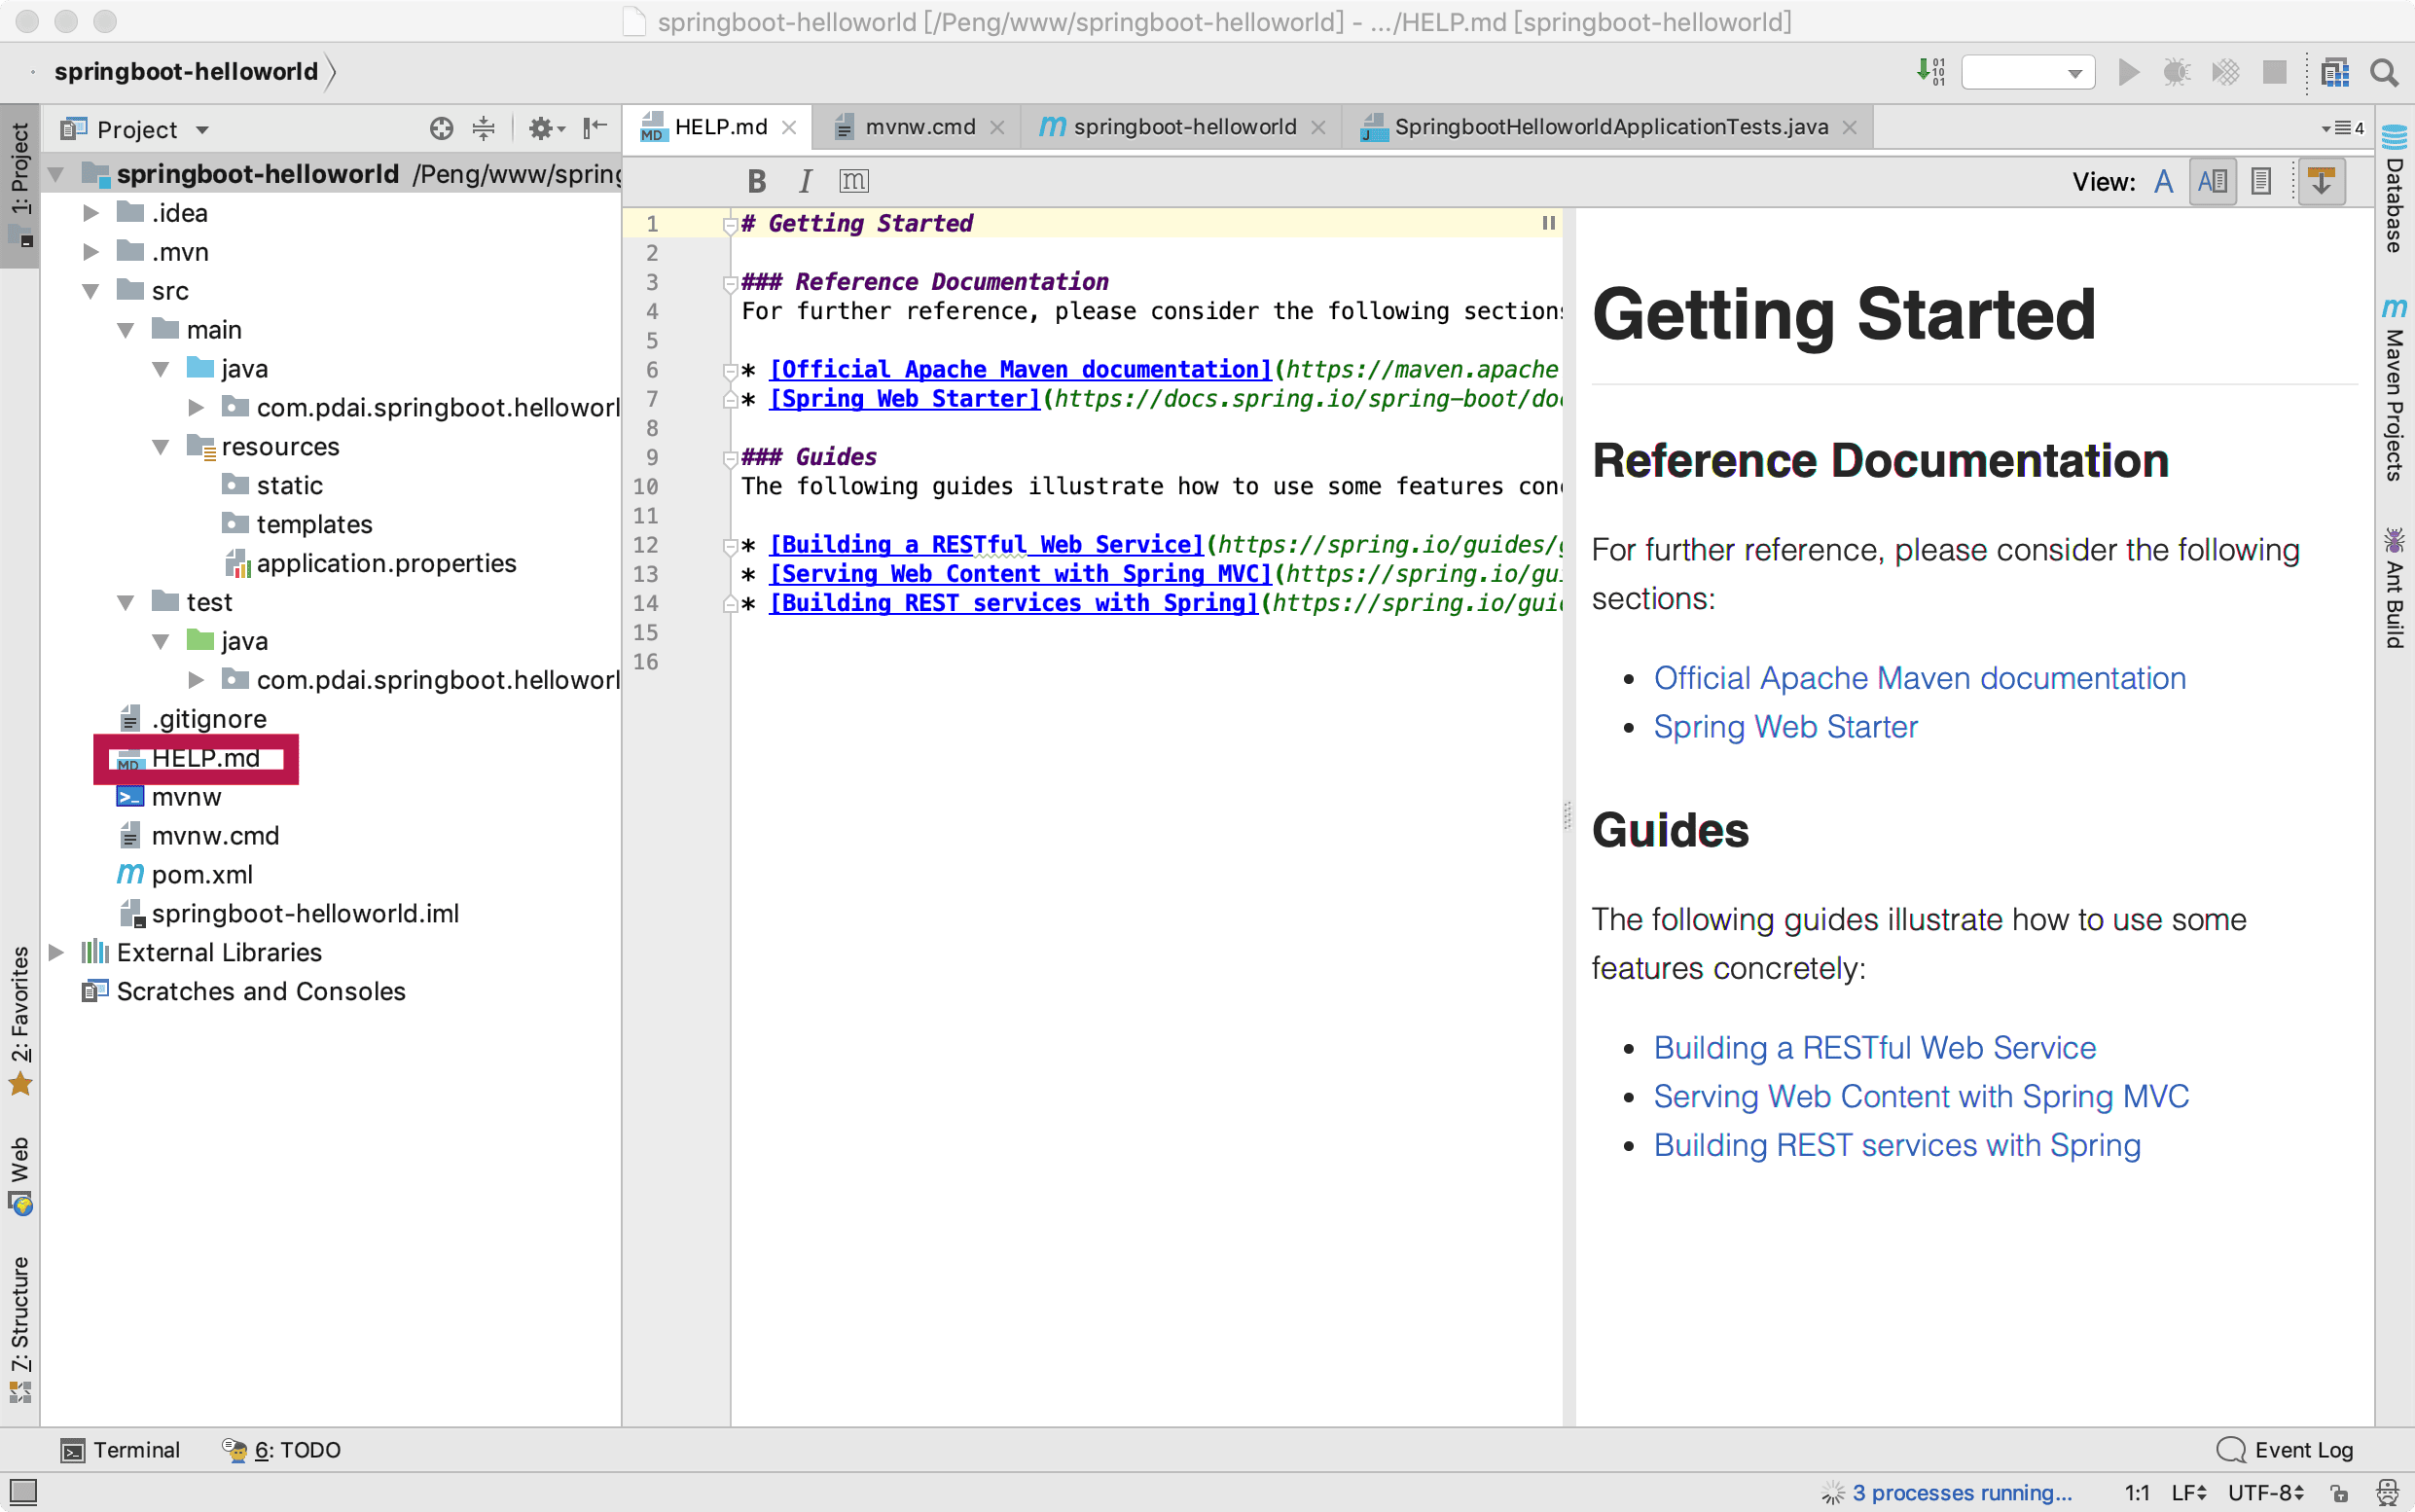
初始化后内容
- README.md
README中可以添加这个项目的介绍,它将显示在github/gitlab/gitee等仓库托管中项目介绍的首页。
- .gitignore
gitignore是git仓库,你可以将不需要提交到代码仓库的文件添加到这个文件(比如程序编译后生成的运行目录target等),默认如下
    HELP.md
    target/
    !.mvn/wrapper/maven-wrapper.jar
    !**/src/main/**
    !**/src/test/**

    ## STS ###
    .apt_generated
    .classpath
    .factorypath
    .project
    .settings
    .springBeans
    .sts4-cache

    ## IntelliJ IDEA ###
    .idea
    *.iws
    *.iml
    *.ipr

    ## NetBeans ###
    /nbproject/private/
    /nbbuild/
    /dist/
    /nbdist/
    /.nb-gradle/
    build/

    ## VS Code ###
    .vscode/
- pom.xml
在Maven包管理pom.xml中添加依赖包
    <?xml version="1.0" encoding="UTF-8"?>
    <project xmlns="http://maven.apache.org/POM/4.0.0"
             xmlns:xsi="http://www.w3.org/2001/XMLSchema-instance"
             xsi:schemaLocation="http://maven.apache.org/POM/4.0.0 http://maven.apache.org/xsd/maven-4.0.0.xsd">
        <parent>
            <groupId>org.springframework.boot</groupId>
            <artifactId>spring-boot-starter-parent</artifactId>
            <version>2.5.3</version>
            <relativePath/> <!-- lookup parent from repository -->
        </parent>

        <modelVersion>4.0.0</modelVersion>
        <groupId>tech.pdai</groupId>
        <artifactId>101-springboot-demo-helloworld</artifactId>
        <version>1.0-SNAPSHOT</version>

        <properties>
            <maven.compiler.source>8</maven.compiler.source>
            <maven.compiler.target>8</maven.compiler.target>
        </properties>

        <dependencies>
            <dependency>
                <groupId>org.springframework.boot</groupId>
                <artifactId>spring-boot-starter-web</artifactId>
            </dependency>
        </dependencies>

        <build>
            <plugins>
                <plugin>
                    <groupId>org.springframework.boot</groupId>
                    <artifactId>spring-boot-maven-plugin</artifactId>
                </plugin>
            </plugins>
        </build>

    </project>
给你的第一个应用添加包和代码
我们添加如下的代码,启动即可启动一个WEB服务,通过浏览器访问/hello, 并返回Hello world.
- 添加代码
    package tech.pdai.springboot.helloworld;

    import org.springframework.boot.SpringApplication;
    import org.springframework.boot.autoconfigure.SpringBootApplication;
    import org.springframework.http.HttpStatus;
    import org.springframework.http.ResponseEntity;
    import org.springframework.web.bind.annotation.GetMapping;
    import org.springframework.web.bind.annotation.RestController;

    /**
     * @author pdai
     */
    @SpringBootApplication
    @RestController
    public class SpringBootHelloWorldApplication {

        /**
         * main interface.
         *
         * @param args args
         */
        public static void main(String[] args) {
            SpringApplication.run(SpringBootHelloWorldApplication.class, args);
        }

        /**
         * hello world.
         *
         * @return hello
         */
        @GetMapping("/hello")
        public ResponseEntity<String> hello() {
            return new ResponseEntity<>("hello world", HttpStatus.OK);
        }

    }
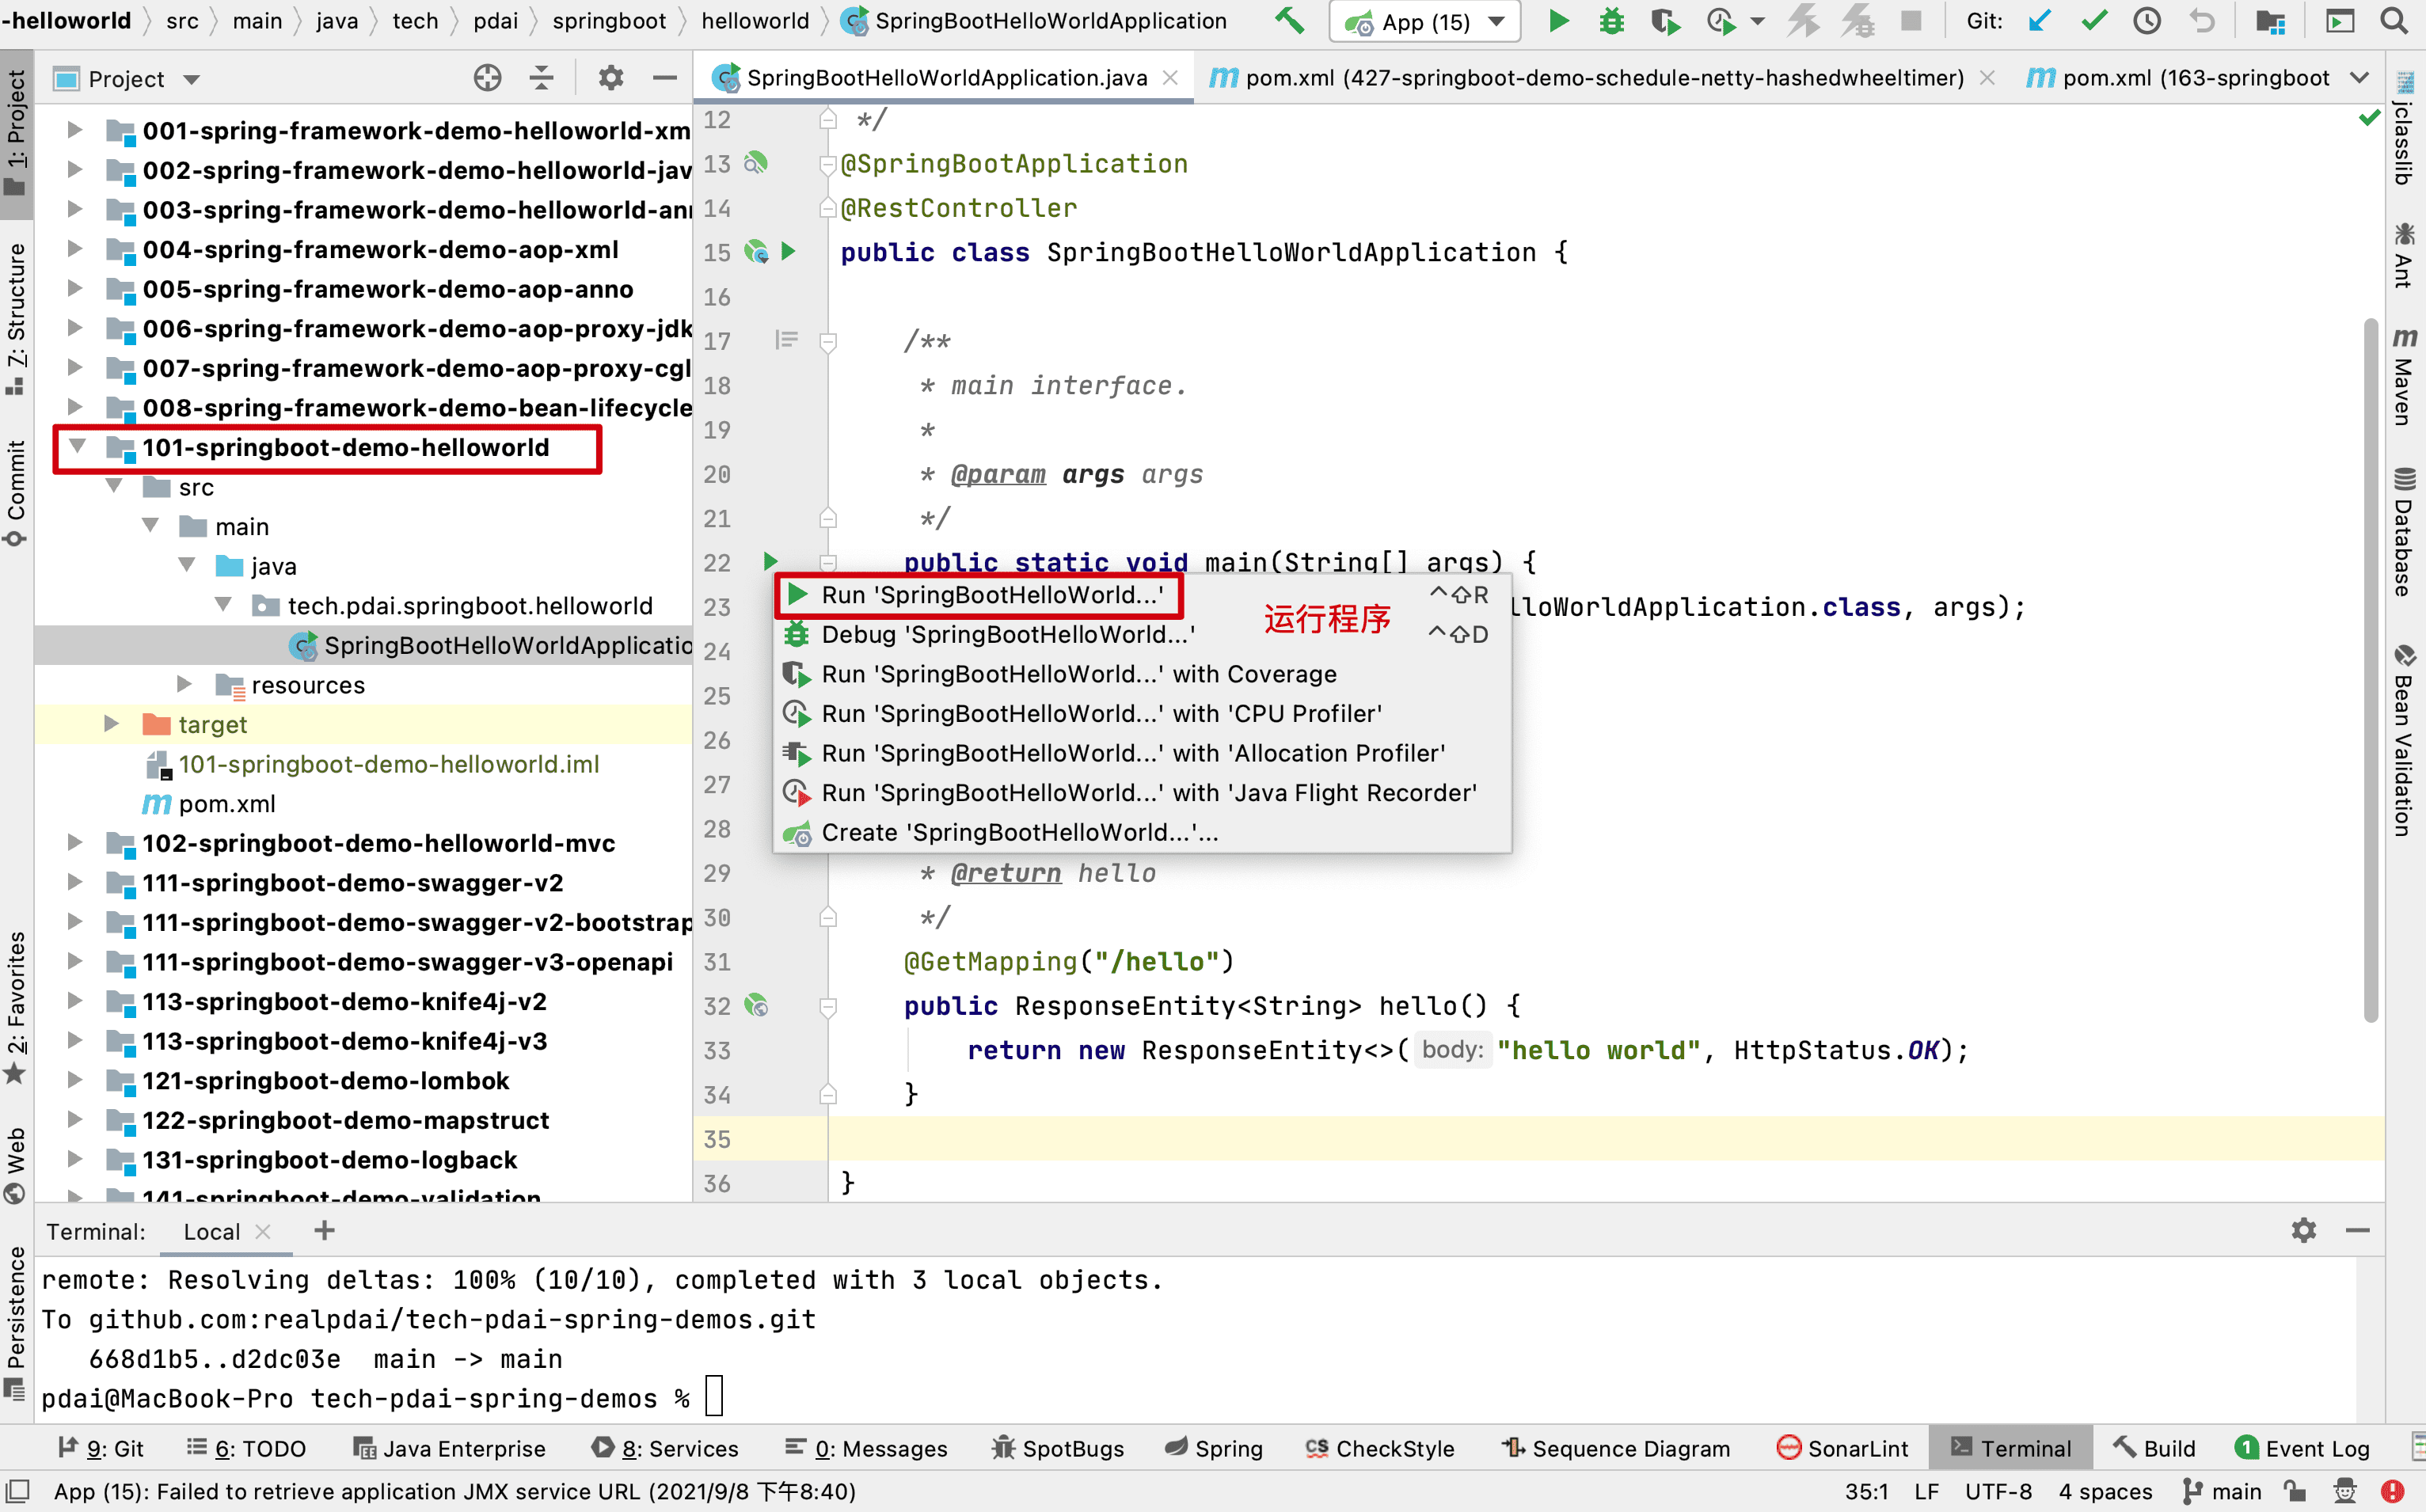
运行你的第一个程序
点击SpringBootHelloWorldApplication入口的绿色按钮,运行程序
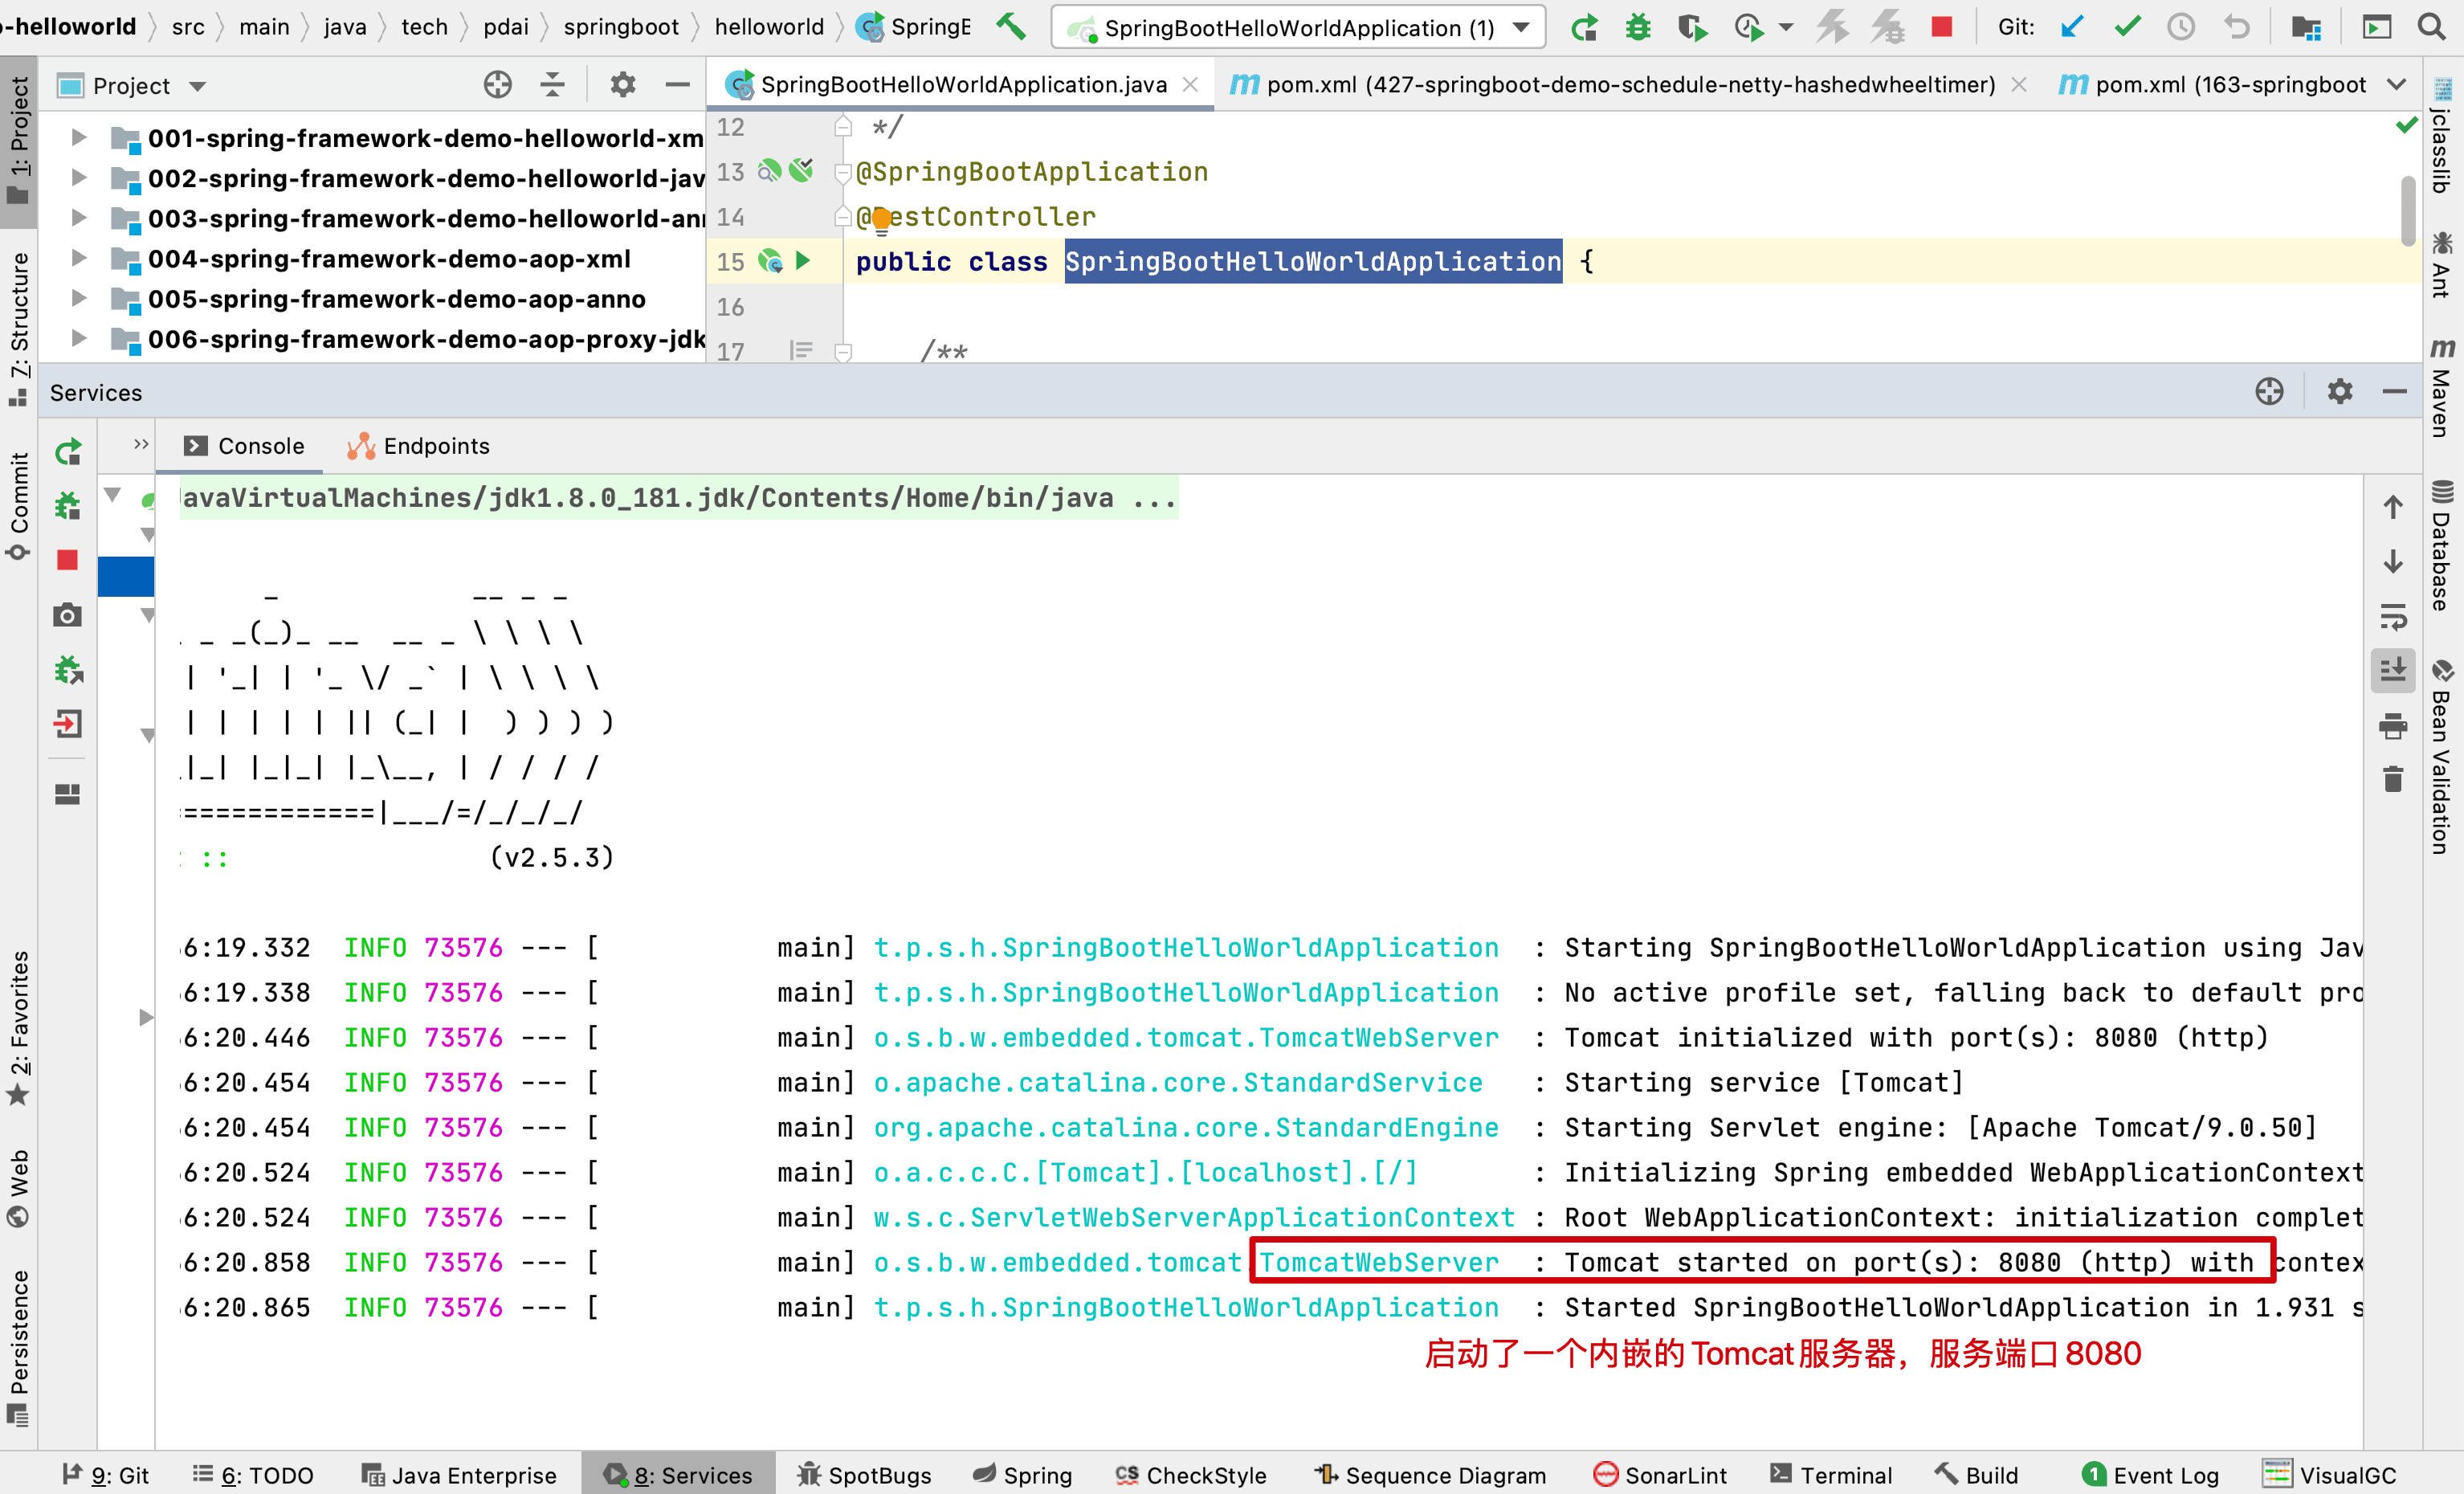
运行后,你将看到如下的信息:表明我们启动程序成功(启动了一个内嵌的Tomcat容器,服务端口在8080)
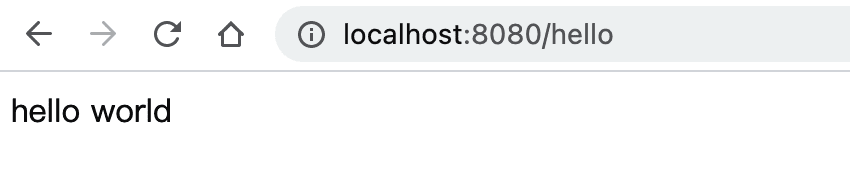
这时候我们便可以通过浏览器访问服务
一些思考
到此,你会发现一个简单的web程序居然完成了。这里你需要一些思考:
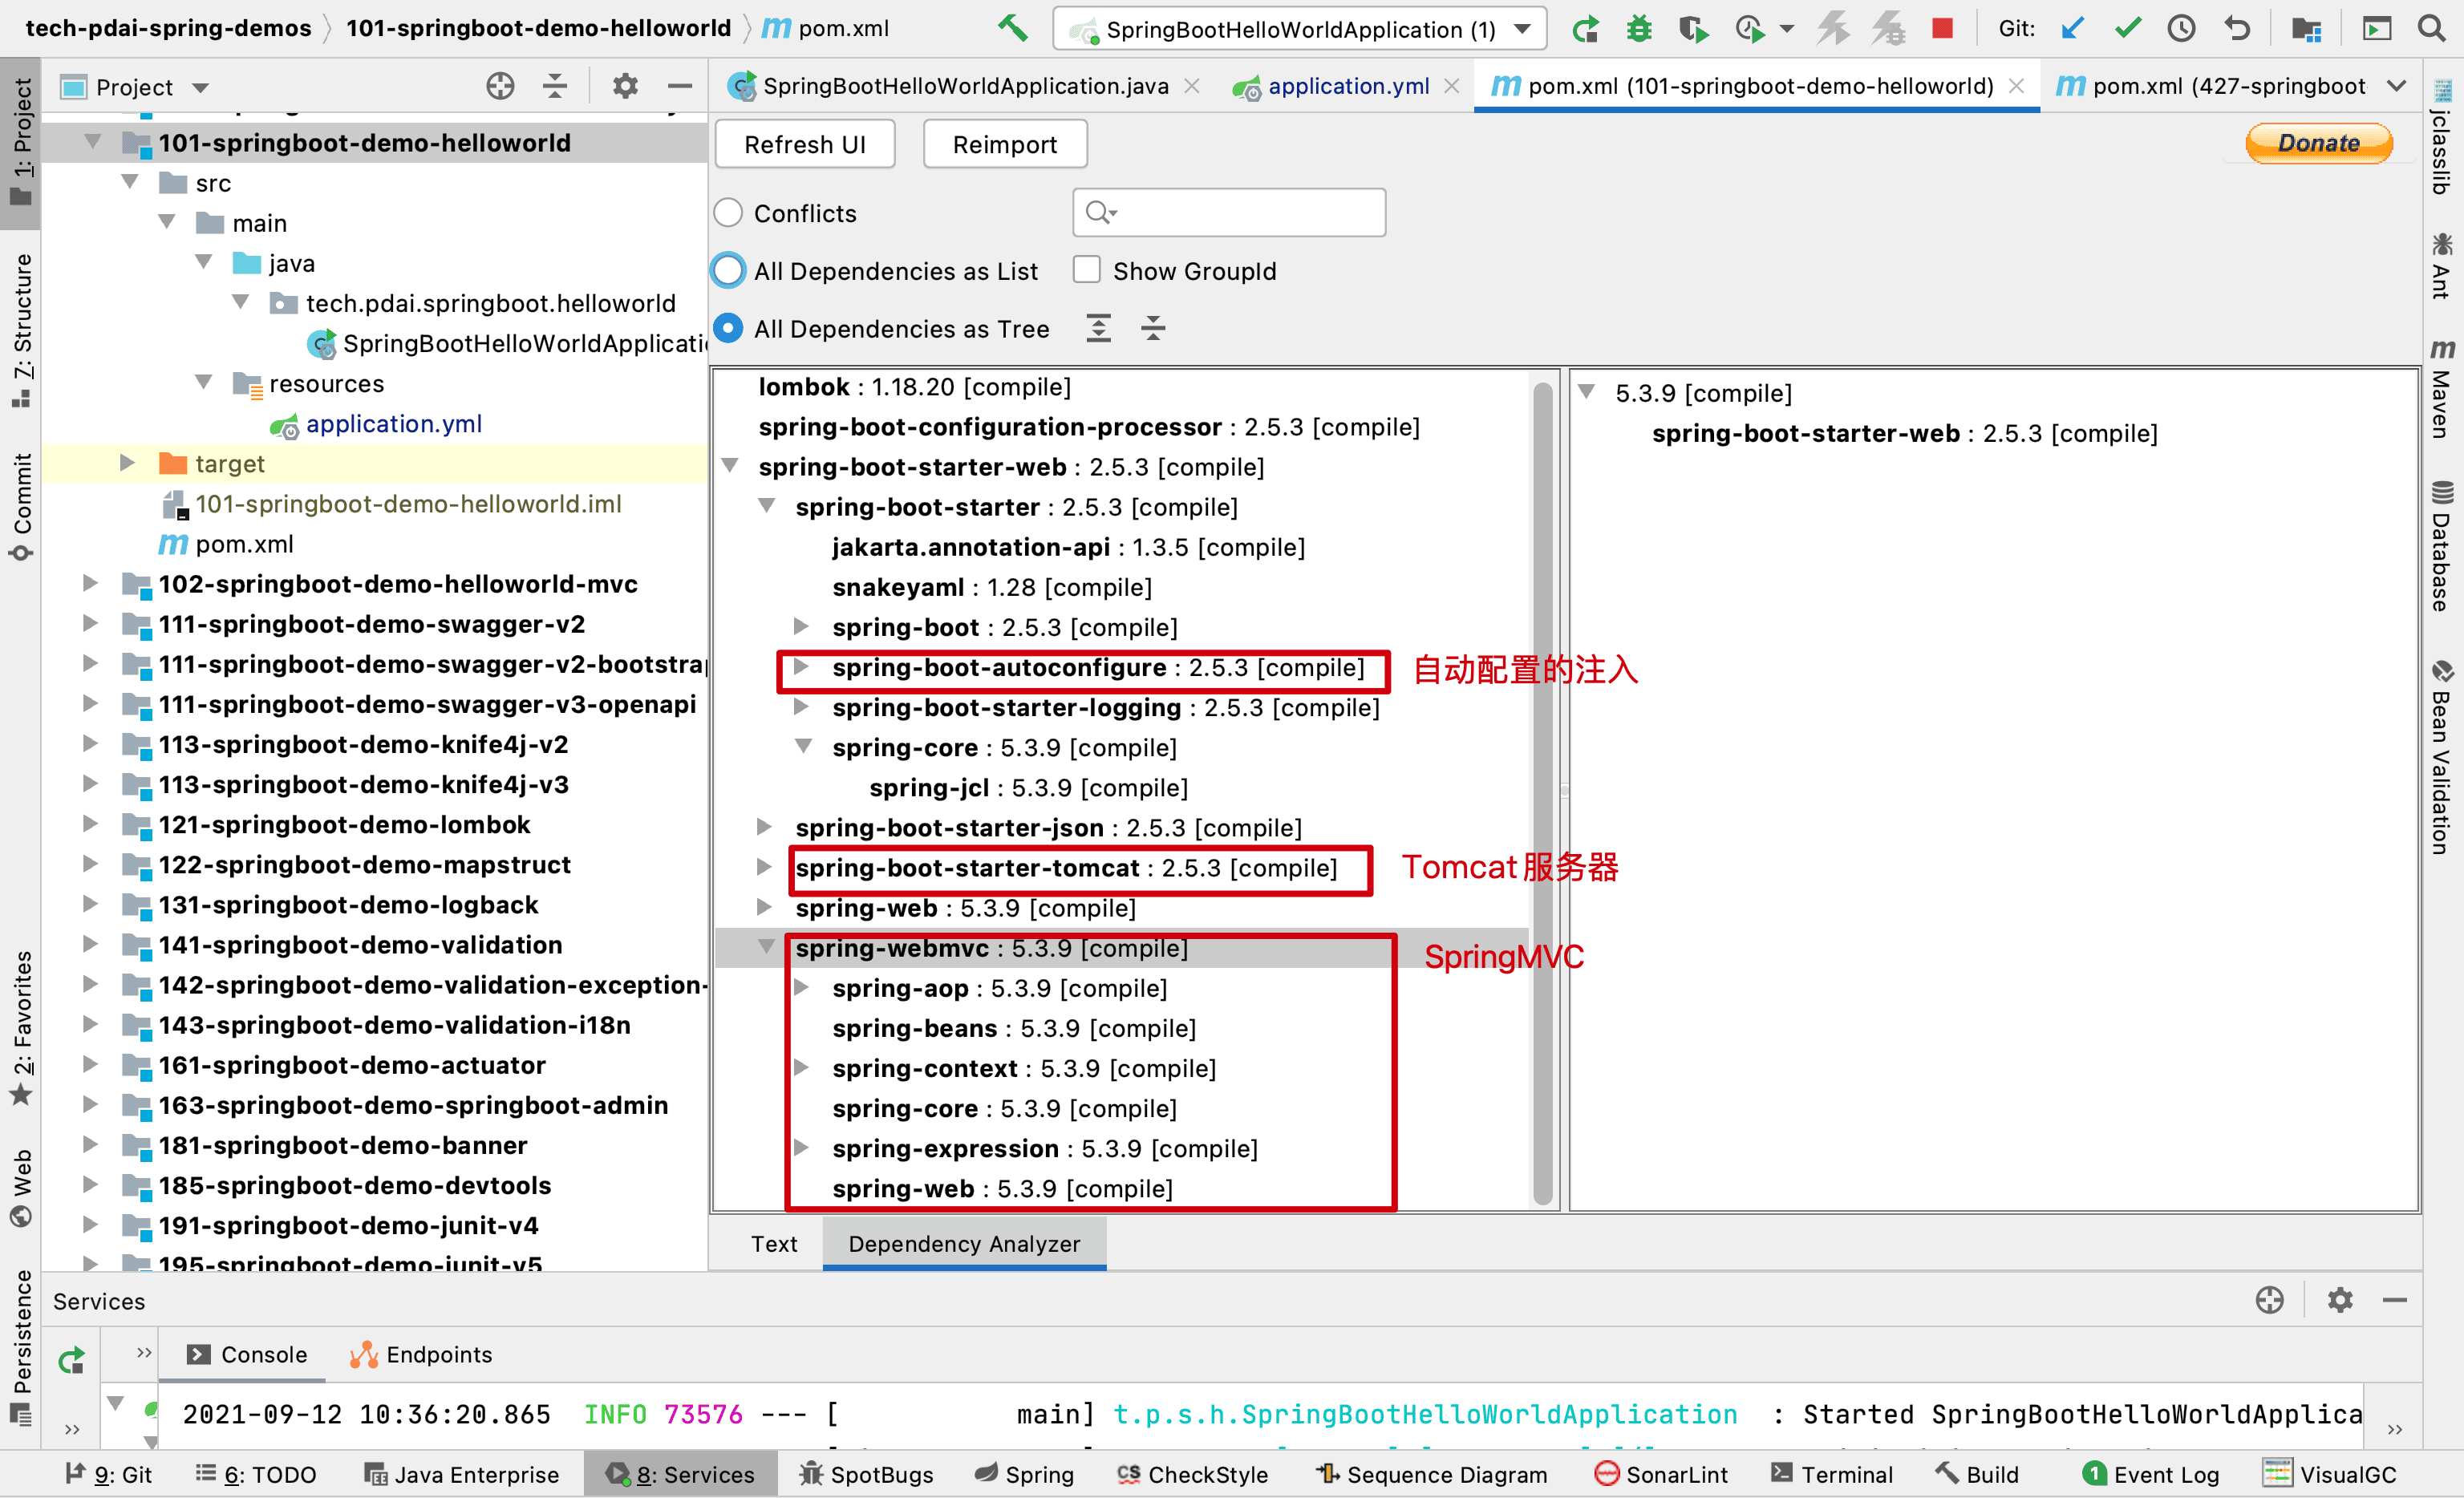
为什么我们添加一个starter-web模块便可以了呢?
我们安装Maven Helper的插件,用来查看spring-boot-starter-web模块的依赖
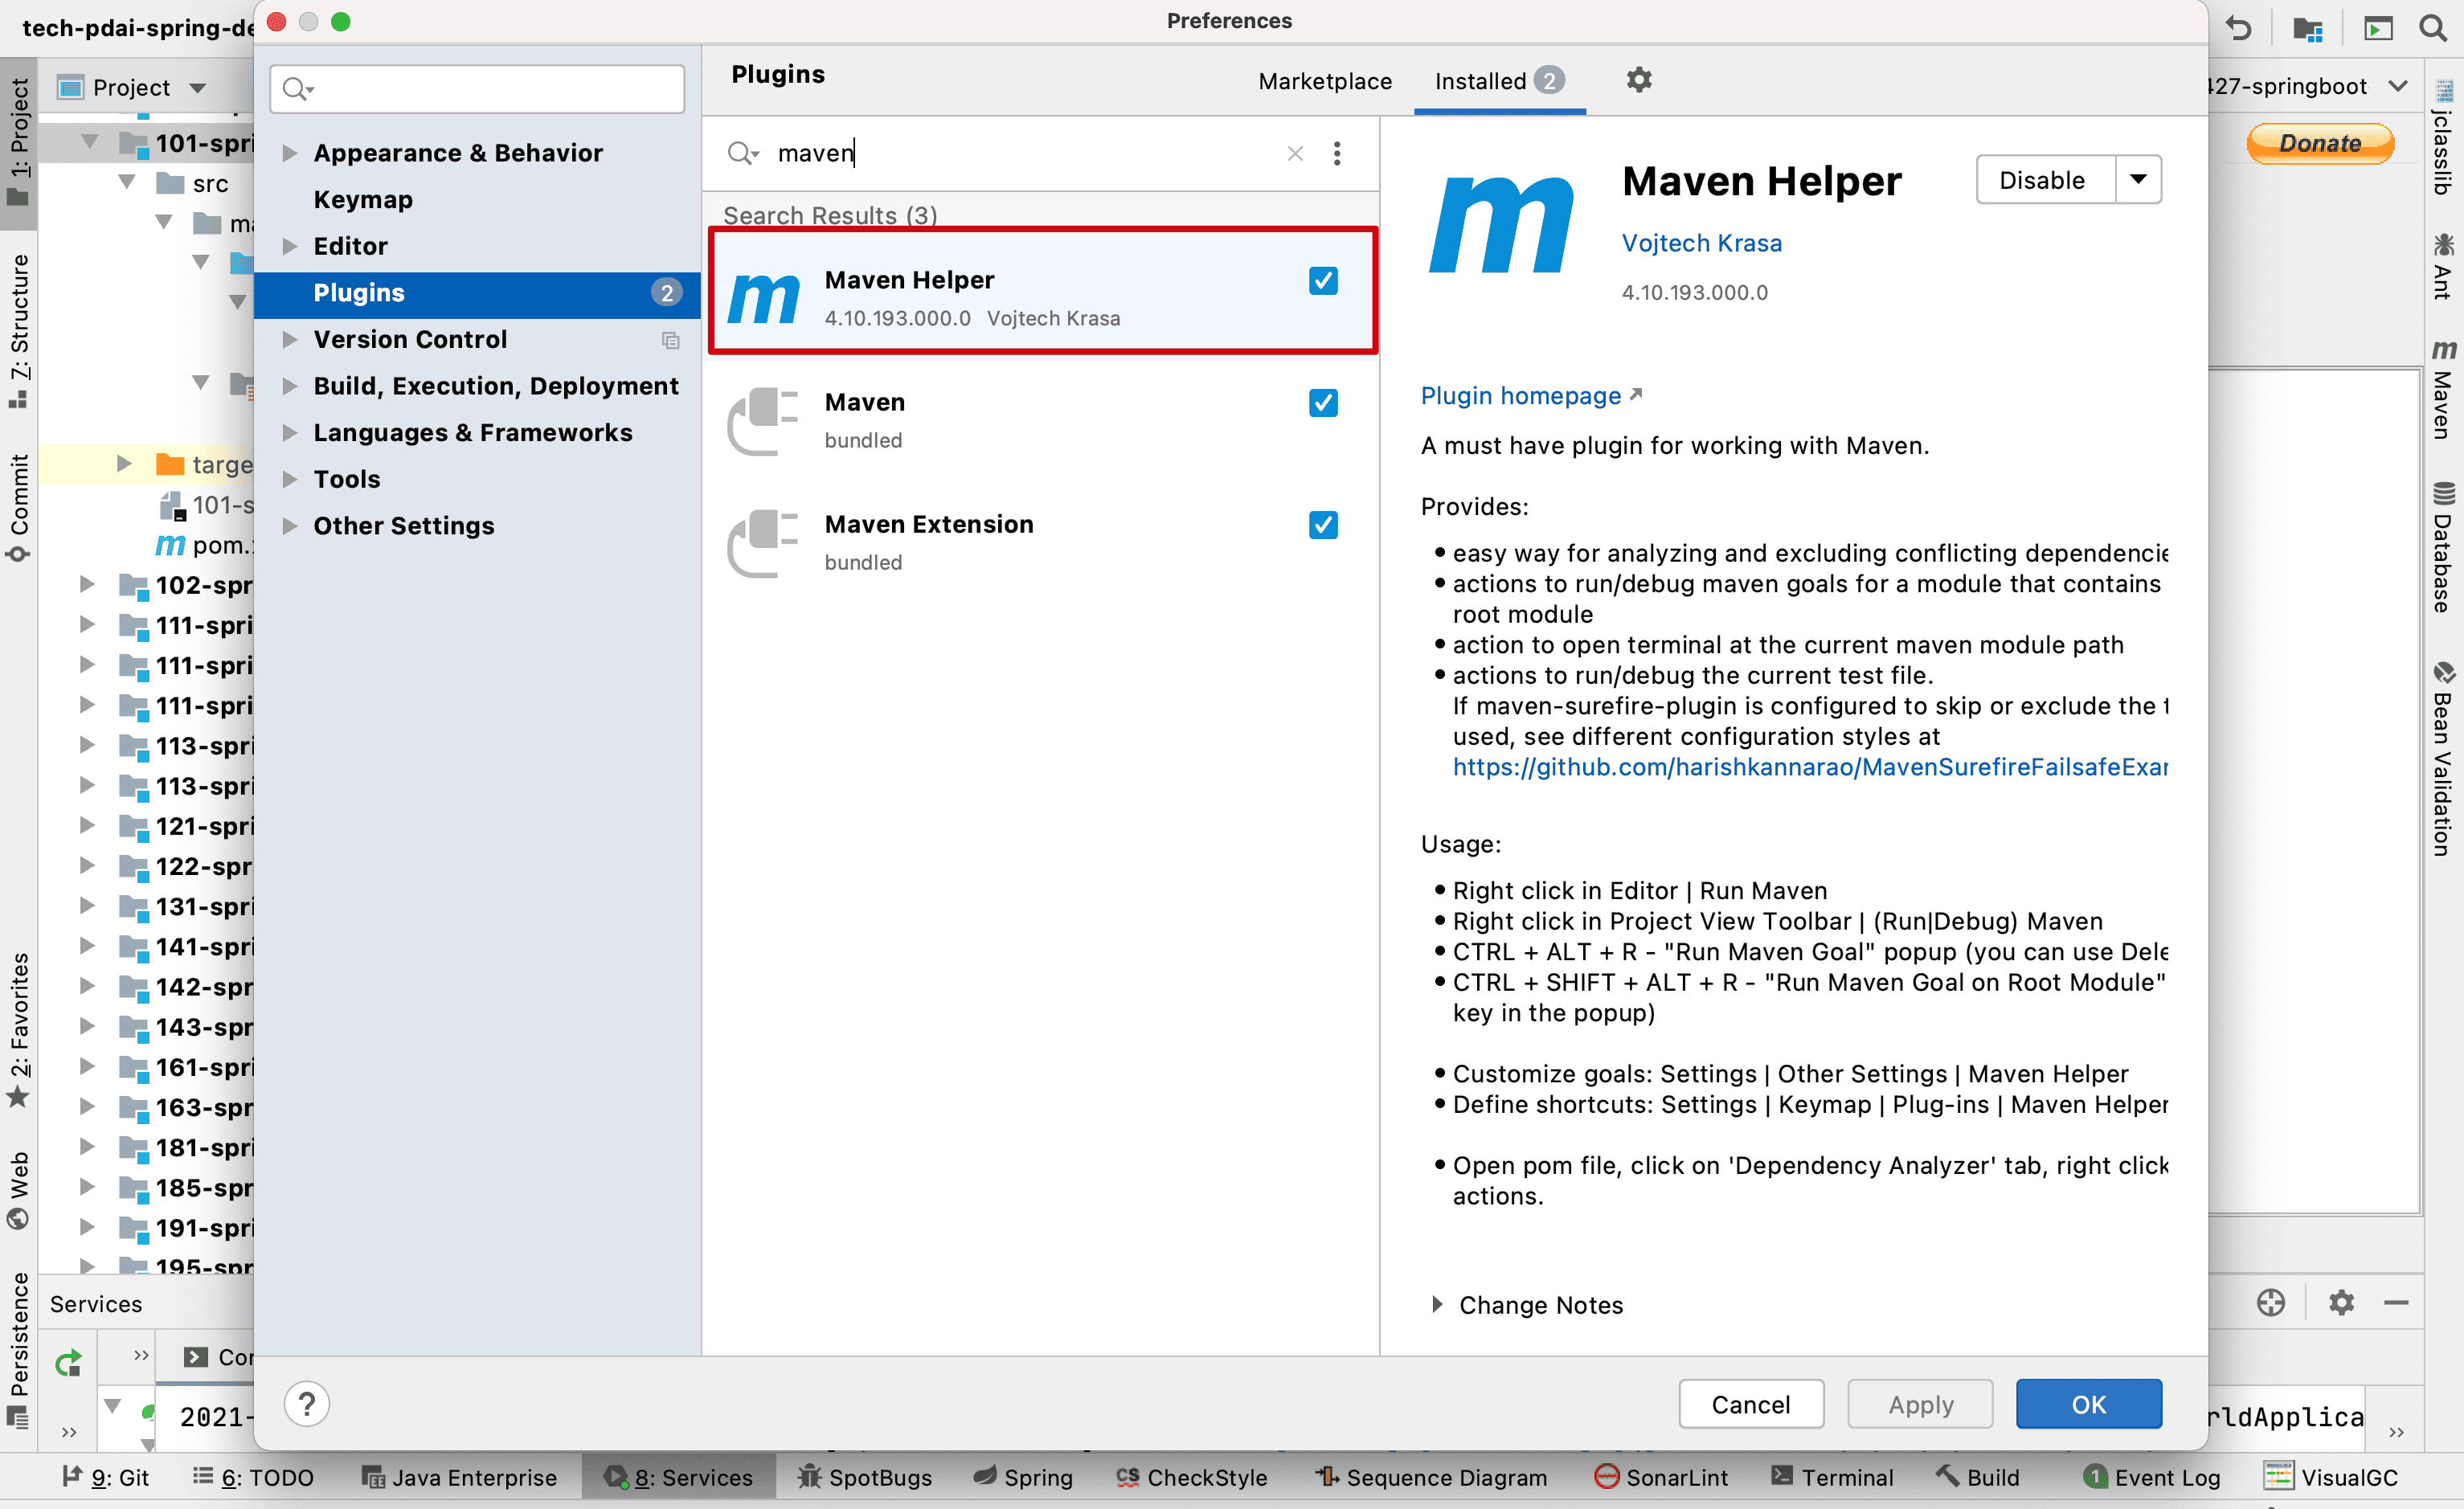
我们看下这个模块的依赖,你便能初步窥探出模块支撑
我们如何更改更多Server的配置呢?比如Tomcat Server
为什么Tomcat默认端口是8080? 如前文所述,SpringBoot最强大的地方在于约定大于配置,只要你引入某个模块的xx- start包,它将自动注入配置,提供了这个模块的功能;比如这里我们在POM中添加了如下的包
    <dependency>
        <groupId>org.springframework.boot</groupId>
        <artifactId>spring-boot-starter-web</artifactId>
    </dependency>
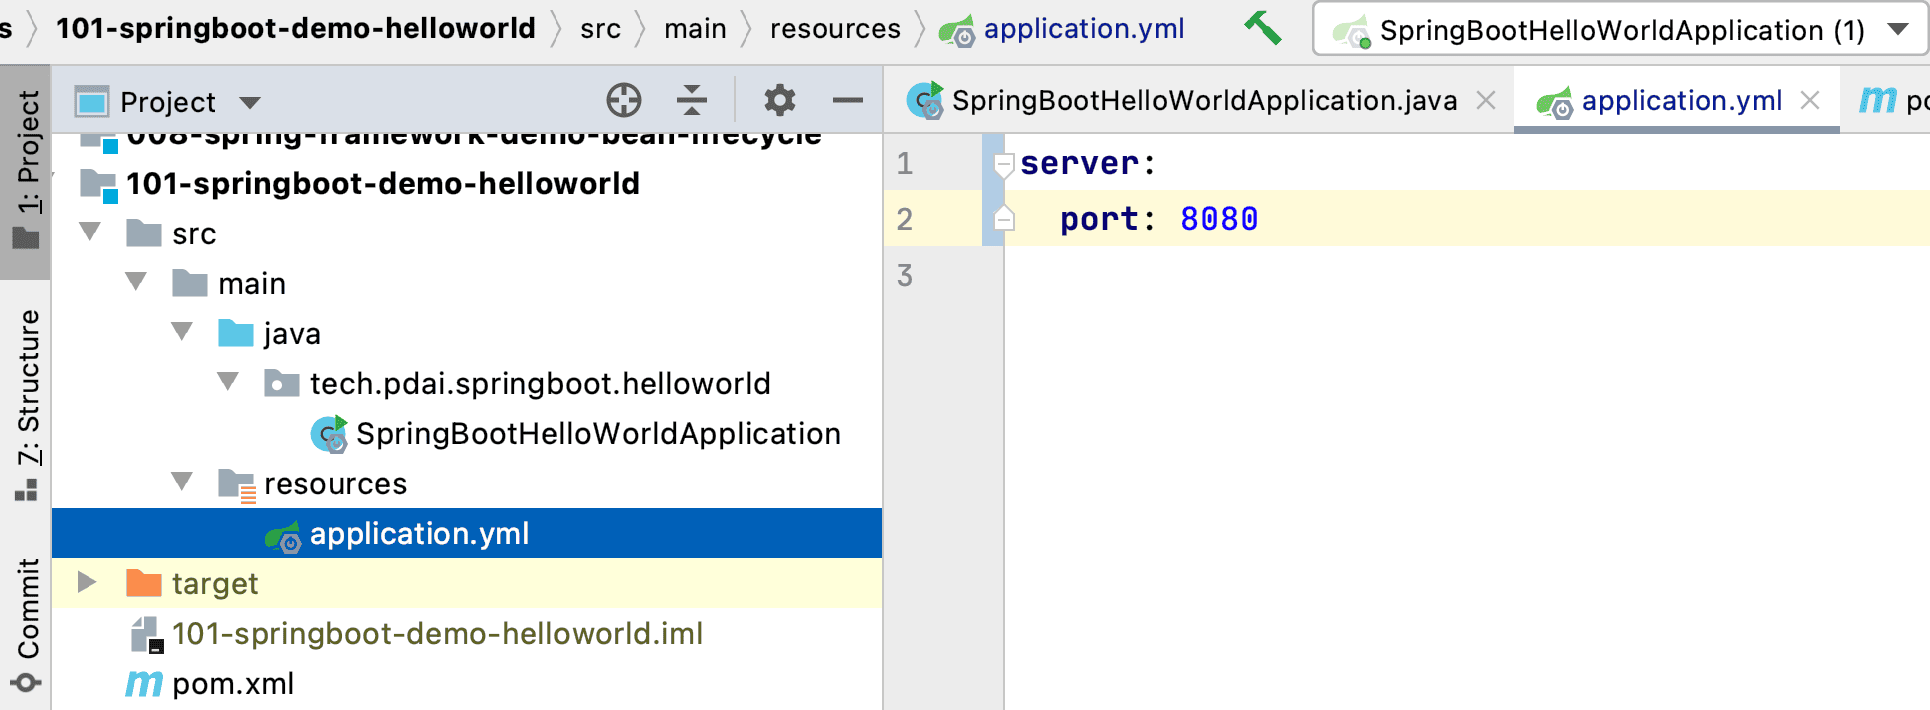
它内嵌了Tomcat并且提供了默认的配置,比如默认端口是8080.
我们可以在application.properties或者application.yml中配置
特别的,如果你添加了如下包
    <dependency>
        <groupId>org.springframework.boot</groupId>
        <artifactId>spring-boot-configuration-processor</artifactId>
        <optional>true</optional>
    </dependency>
并且你的IDE支持(比如IDEA商业版),可以自动给你配置提示
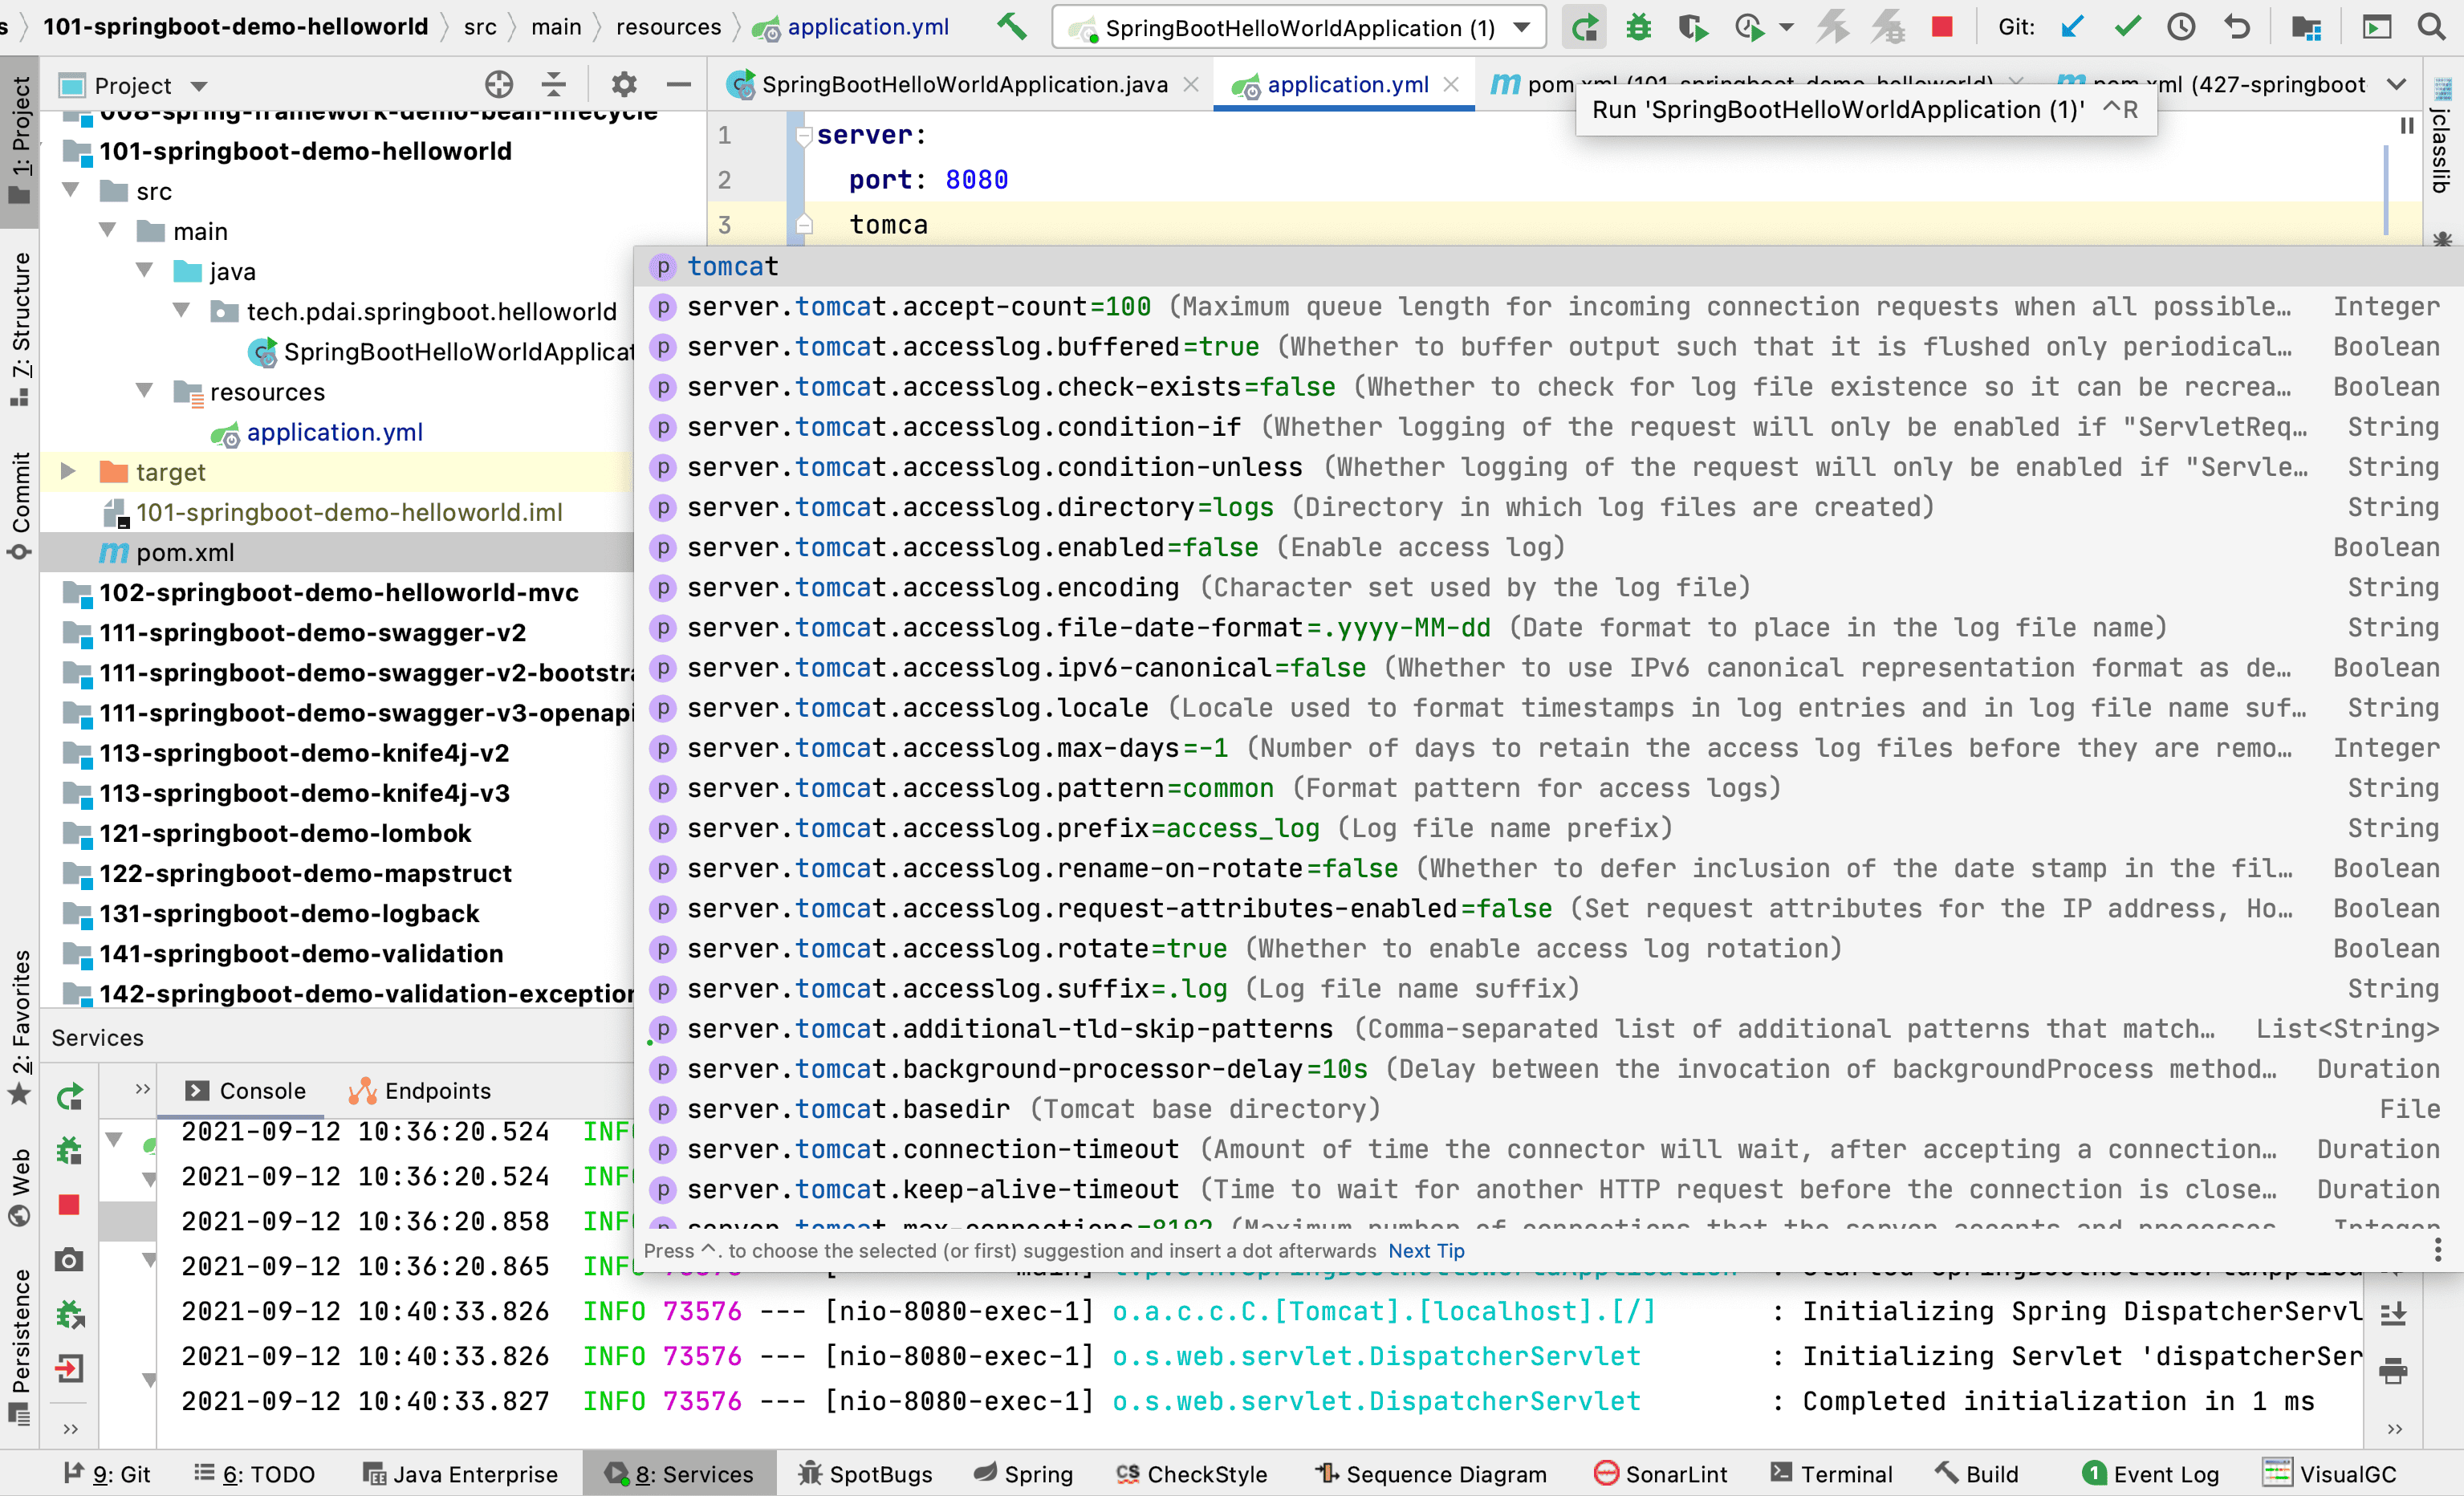
你也可以(cmd+点击)进入具体的配置文件。
SpringBoot还提供了哪些starter模块呢?
Spring Boot 推荐的基础 POM 文件
| 名称 | 说明 |
|---|---|
| spring-boot-starter | 核心 POM,包含自动配置支持、日志库和对 YAML 配置文件的支持。 |
| spring-boot-starter-amqp | 通过 spring-rabbit 支持 AMQP。 |
| spring-boot-starter-aop | 包含 spring-aop 和 AspectJ 来支持面向切面编程(AOP)。 |
| spring-boot-starter-batch | 支持 Spring Batch,包含 HSQLDB。 |
| spring-boot-starter-data-jpa | 包含 spring-data-jpa、spring-orm 和 Hibernate 来支持 JPA。 |
| spring-boot-starter-data-mongodb | 包含 spring-data-mongodb 来支持 MongoDB。 |
| spring-boot-starter-data-rest | 通过 spring-data-rest-webmvc 支持以 REST 方式暴露 Spring Data 仓库。 |
| spring-boot-starter-jdbc | 支持使用 JDBC 访问数据库。 |
| spring-boot-starter-security | 包含 spring-security。 |
| spring-boot-starter-test | 包含常用的测试所需的依赖,如 JUnit、Hamcrest、Mockito 和 spring-test 等。 |
| spring-boot-starter-velocity | 支持使用 Velocity 作为模板引擎。 |
| spring-boot-starter-web | 支持 Web 应用开发,包含 Tomcat 和 spring-mvc。 |
| spring-boot-starter-websocket | 支持使用 Tomcat 开发 WebSocket 应用。 |
| spring-boot-starter-ws | 支持 Spring Web Services。 |
| spring-boot-starter-actuator | 添加适用于生产环境的功能,如性能指标和监测等功能。 |
| spring-boot-starter-remote-shell | 添加远程 SSH 支持。 |
| spring-boot-starter-jetty | 使用 Jetty 而不是默认的 Tomcat 作为应用服务器。 |
| spring-boot-starter-log4j | 添加 Log4j 的支持。 |
| spring-boot-starter-logging | 使用 Spring Boot 默认的日志框架 Logback。 |
| spring-boot-starter-tomcat | 使用 Spring Boot 默认的 Tomcat 作为应用服务器。 |
所有这些 POM 依赖的好处在于为开发 Spring 应用提供了一个良好的基础。Spring Boot 所选择的第三方库是经过考虑的,是比较适合产品开发的选择。但是 Spring Boot 也提供了不同的选项,比如日志框架可以用 Logback 或 Log4j,应用服务器可以用 Tomcat 或 Jetty。
示例源码
https://github.com/realpdai/tech-pdai-spring-demos